


Hey y'all! I am at Myrtle Beach right now visiting with some family from out of town, and I got an e-mail last night saying I was going to be featured on Tip Junkie . Needless to say, I WAS FLOORED!!! I had submitted some paper ornaments I made at Christmas time, but then completely forgotten about it. Well what a pleasant surprise!!!
I have been so consumed in my day to day life between work, kids, VBS, company, and vacations, that I have really let my blog slip by the wayside. I have missed it terribly, but have had a very hard time getting back into the groove of things. This is just the kick I needed to get motivated. I am a little panicked because having been gone for months, I feel like I am having a bunch of company come over and my house (blog) is a mess.
If you are stopping by for the first time, please stay a while and visit. I apologize for the mess! Come back in the next week or so and I will be getting some new projects posted. If you are an old friend, I have missed you SOOO MUCH! I look so forward to catching up and seeing what y'all have been up to!
Thursday, July 22, 2010
Thursday, February 11, 2010
Easy Valentine Tutorial...
Hey friends! I am still here. My "little piece of paradise" as I call it has become increasingly crazy these days. I have started my part-time job at the tax office, and still do my magazine job from home. I also somehow agreed to coach Walker's soccer team, and heap on to that lots of doctors appointments for Connor and a household that needs a full time live-in maid (that's how it feels anyway) and there just aren't enough hours in the day! I have been struggling to find balance, and when something has to take a backseat it always seems to be my blog. I have missed you all terribly and feel so out of the loop. I just know you have all been up to lots of fabulous decorating and crafting. I would love to visit each and every one of my blogging buddies, but for now I will have to be content to just check in occasionally and really catch up when April 15 gets here and tax season is OVER!!
Wowser, that was quite an introduction for the quick tutorial I was gonna share with you. Back to the subject at hand. I have posted in the past how I make my cards on SCRAPBLOG and I have friends that ask me about it a lot, so I thought I would post another easy tutorial on it. Here is the Valentines Day Card I did this year.

Wowser, that was quite an introduction for the quick tutorial I was gonna share with you. Back to the subject at hand. I have posted in the past how I make my cards on SCRAPBLOG and I have friends that ask me about it a lot, so I thought I would post another easy tutorial on it. Here is the Valentines Day Card I did this year.

Here's how I did it.
Go to Scrapblog's site, and create an account. They have a fantastic site. Beware, you can get lost in time playing with all the possibilities and hours will disappear from your day. Anyway, I always start with a blank canvas. You can start with kits or templates, but I like to start from scratch. I choose my backgrounds, stickers, and borders that are free. Some of their stuff costs money,they call it credits, but you have to pay for them. The prices are very reasonable, so if you find something you love, go for it. But for me part of the fun is trying to make them for free.
Just upload your pictures and play around until you have created something you like.
Next you want to "publish" what you made. The button for this is at the top of the screen. Once you have done that, you will be able to click on the "file" tab and export it as a JPEG onto your computer.- I then upload my saved file to Walgreens or a similar photo printing service and print them for about 9 cents a piece.
After buying a box of envelopes, I am getting great looking unique cards, invitations, etc. for a fraction of the price. I hope you try this out. If you do let me know. If this is not very clear, feel free to e-mail me with questions. It's getting late and the bed is calling my name. I hope you all have a fantastic Valentine's Day and I will be back as soon as I possibly can!
Monday, January 18, 2010
Christmas Re-Cap...
I realize that we are well on our way into 2010, but since I was so far behind on my blogging and missed out on all the Christmas fun, I thought I would do a bit of a Christmas Re-Cap. Atleast this way when next Christmas rolls around I'll be able to remember what I did this past Christmas. Right now I can barely remember yesterday. My memory is like swiss cheese, full of holes! Anyway, here are some of my favorite things from this Christmas.
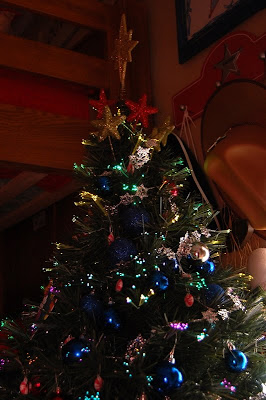
I scaled back this year in all areas. We bought less. We did more hand made. I even decorated less. I had a hard time getting into the decorating and it felt a little forced, so I spent less time decking the halls and a lot more time enjoying the season with my boys. Looking back, those changes were all for the best. With that said, I didn't put up all of my trees. We did the boys' tree in the family room:

This tree has all of the ornaments they have made or picked out in their short little lives. They are all about the colored lights, so I just go with it.
This is the mantle in the family room. Walker helped me put it up and he was so proud. It is in the same room as the boys' tree so it also has colored lights.


Walker got a new tree for his room this year. It was a tacky little tree, but he LOVED it, and that is what matters.
Connor's tree is white and he enjoys having one in his room so much.

I put the 30 year old tree from Lon's childhood in my kitchen window. It holds ornaments the boys have made in church and school. Those are the most special ornaments to me.

I hung this wreath that I "beefed up" on the front door.

I put this tall wooden snowman on the front porch.

I put all of our Christmas cards on a simple ribbon.

We made a lot of people birdhouses:


But more than anything else, we spent time together. We crafted, baked, watched Christmas movies, and drank more hot calorie laden drinks than it should be legal to consume in a month's time. Guess that explains why I will be starting Weight Watchers Wednesday back up on Wednesday! I hope your Christmas was a great one, full of special times with family and friends too!
I scaled back this year in all areas. We bought less. We did more hand made. I even decorated less. I had a hard time getting into the decorating and it felt a little forced, so I spent less time decking the halls and a lot more time enjoying the season with my boys. Looking back, those changes were all for the best. With that said, I didn't put up all of my trees. We did the boys' tree in the family room:

This is the mantle in the family room. Walker helped me put it up and he was so proud. It is in the same room as the boys' tree so it also has colored lights.


We made the boys teachers ornaments and some baked goods. This is one of Walker's ornaments.

And here is Connor's ornament for his teacher.

Tuesday, January 12, 2010
Coat Rack Re-do...
Hey friends! I am finally getting back into a daily routine and that means back into blogging! I have several projects I finished in the past month or so, and I will start posting about them this week.
I don't know about you, but we have a "Catch All" coat rack/shoe bin that is right inside the backdoor from the garage. It has bugged me since we moved into the house over a year ago. I was uninspired to do too much to it though, with all of the other projects that I had going on. Now that most of the bigger projects are done, I am moving on to smaller things. This coat rack was on that list.
Here is how it looked for the past year:
 And here it is now:

 The shelf is 48 inches wide and is stained in a dark finish. I was originally gonna put a piece of beadboard on the wall and stain it the same color, then try to find a bench to sit at the bottom so it looked more like a built-in. But when my mother in law came across this trunk, and it was already the right size and color, I abandoned the original plan and went the easier route. I got a great deal on the trunk and just made a cushion for the top.
 What do you think of the new space? I love it! It is so much more functional and it just makes me happy when I come in the back door, and isn't having a home that makes you feel good what all the decorating is about anyway?
I don't know about you, but we have a "Catch All" coat rack/shoe bin that is right inside the backdoor from the garage. It has bugged me since we moved into the house over a year ago. I was uninspired to do too much to it though, with all of the other projects that I had going on. Now that most of the bigger projects are done, I am moving on to smaller things. This coat rack was on that list.
Here is how it looked for the past year:
 And here it is now:
 The shelf is 48 inches wide and is stained in a dark finish. I was originally gonna put a piece of beadboard on the wall and stain it the same color, then try to find a bench to sit at the bottom so it looked more like a built-in. But when my mother in law came across this trunk, and it was already the right size and color, I abandoned the original plan and went the easier route. I got a great deal on the trunk and just made a cushion for the top.
 As for the rest of the decor, I shopped my house so I didn't have to spend any moola. I mixed a bunch of paints together and created a blue that I liked. I painted the Welcome sign and "HOME" letters in that.  I made the floral arrangements for my mantle a long time ago, and didn't like them there, so I moved them and they work much better in this space.
 I made the floral arrangements for my mantle a long time ago, and didn't like them there, so I moved them and they work much better in this space.
 What do you think of the new space? I love it! It is so much more functional and it just makes me happy when I come in the back door, and isn't having a home that makes you feel good what all the decorating is about anyway?
 I am linking up to Kimba's DIY Day:

Wednesday, December 30, 2009
HELLOOOO OUT THERE!!
Hey friends! I am so sorry for the unexpected blogging hiatus. My taking 3 weeks off was completely unintentional, but my "real life" has been so upside down and busy that my blog had to go to the back burner.
I had so much more Christmas stuff I wanted to post, and I didn't even get to join in on the Nester's Christmas party. Who knows, maybe I'll backtrack and put some of that stuff up anyway.
So what have we been up to? Well, both boys had their school Christmas programs...

 And then Lonnie was "Santa" for both schools.
 Can you believe the boys have no idea this is their dad?
 As usual, I took on too many handmade Christmas projects and was scrambling to get them all done. I'll try post about some of those soon.
The boys have been sicker than they have ever been. So sick that Conman was actually hospitalized for a short spell. Here is my little guy about to be discharged chowing down on some Pringles.
 Thankfully, things are starting to look up. The boys are finally feeling more like themselves. We had a fantastic Christmas and I plan to find my blogging mojo again soon. I hope you had a wonderful Christmas season, and I am gonna try to catch up with all of you soon.
Thursday, December 10, 2009
Handprint Angel Ornament/Garland...
I teach the 4 and 5 year olds every week in Sunday School. Being that I love to craft, I always try to come with good things for the kids to make that go along with our lesson. This past week we studied in the book of Luke where the angel told Mary that she was going to give birth to baby Jesus. I decided an Angel was the craft to make. BUT, a cute angel that 4 and 5 year olds could make was key. I came up with this little Angel Christmas ornament, and the kids loved them. I did most of the work in advance because it is hard to do with a lot of kids really quickly (we had 11 kids this week with just Lonnie and I), but at home the boys and I made these quite easily.

 Materials:
scrapbook paper or craft foam (body, head, and hair)
posterboard or cardstock (wings)
Clothespins
pencil (to trace child's hands)
pipe cleaner (halo)
ribbon (to hang your garland on)
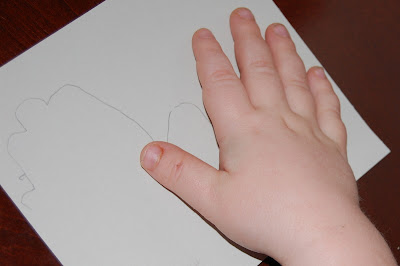
Start off by tracing your child's hand prints on to the posterboard or cardstock. I found it works best to trace the left hand and then have them put their right thumb in the thumbprint of the left hand. They need to keep their fingers together. The pics below explain this better.


 Materials:
scrapbook paper or craft foam (body, head, and hair)
posterboard or cardstock (wings)
Clothespins
pencil (to trace child's hands)
pipe cleaner (halo)
ribbon (to hang your garland on)
Start off by tracing your child's hand prints on to the posterboard or cardstock. I found it works best to trace the left hand and then have them put their right thumb in the thumbprint of the left hand. They need to keep their fingers together. The pics below explain this better.


Next, draw out your outfit (girl or boy), hair, and head. I traced a bottle cap for the head and free-handed the outfits on scrapbook paper. If you don't feel like you could free-hand the clothes, just hold a piece of paper over your computer screen and trace the ones I did. That is probably a terrible method, but it would work. Cut out all of your pieces. You could let the kids draw the face on the angel.
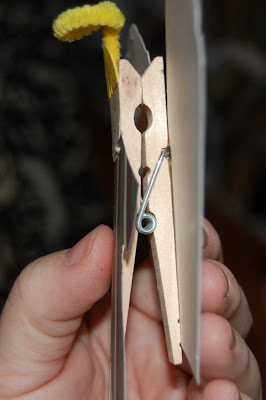
Make the pipe cleaner look like a halo by wrapping it around your finger. Glue it to the top of the clothespin.
 Then glue on your body, and save the head and hair for last.
 Then glue on your body, and save the head and hair for last.
The final step is to glue your wings to the back side of the clothes pin.
 This is how it looks from the side. You could put your wings on the same side of the pin as the angel, but I wanted the dimension it gives by doing it this way.
I bought this pom pom ribbon at the Dollar Tree for, you guessed it, $1.
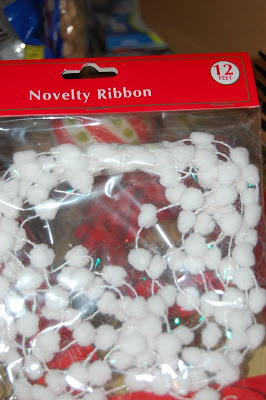 String it up and clip on the angels.
 Here is the girl version, but I used some of the pom pom ribbon as a halo and printed card-stock to trace Connor's handprints.
 Here are the boys' 2 angels on my little tree in the kitchen window. I put most of the ornaments the boys make on this tree because those are extra special to me. I just wrapped the pom pom ribbon around the tree and clipped them right on.
 My kids loved these and I loved that they had the kids handprints on them. I hope you make some yourself. Let me know how they turn out.
 This is how it looks from the side. You could put your wings on the same side of the pin as the angel, but I wanted the dimension it gives by doing it this way.
 I bought this pom pom ribbon at the Dollar Tree for, you guessed it, $1.
 String it up and clip on the angels.
 Here is the girl version, but I used some of the pom pom ribbon as a halo and printed card-stock to trace Connor's handprints.
 Here are the boys' 2 angels on my little tree in the kitchen window. I put most of the ornaments the boys make on this tree because those are extra special to me. I just wrapped the pom pom ribbon around the tree and clipped them right on.
 My kids loved these and I loved that they had the kids handprints on them. I hope you make some yourself. Let me know how they turn out.
Tuesday, December 8, 2009
FUN Paper Ornaments!
I am happy to say that my 2 boys inherited my love for working with their hands. We are always looking for crafts that they can do with me. I saw an idea for paper ornaments a while back, and decided to put my own spin on it. I have TONS of scrapbook stuff but have not scrapped in a long time, so this one allows me to use some of that fantastic paper. Here is a quick and easy tutorial on how to make your own.
 Materials:
Scrapbook Paper (the thicker kind works best)
Ribbon
Hole Punch
Scissors or Paper Cutter
 This is REALLY EASY and there are a million different ways you could do this and get very different looks. Feel free to put your own spin on it, but here is how I did mine.
I took 12x12 scrapbook paper, and cut it in half. I then cut the 6x12 piece of paper into 12 strips of 1x6 inch paper. Next, pick 6-12 pieces of the colors you like and make a pile. The more paper you use the fuller your ornament will be. If you choose a double sided paper, then you may want to use fewer pieces so you can see in the middle.
Now, punch a hole in both ends of the strips.
Cut a piece of ribbon 22-24 inches long. Fold it in half and feed it through one of the holes.
 Tie a knot.

 (I added a bead to this one, but not the others, so that is optional.)
 Next, let your extremely proud toddler hold up what he made for the camera.

 Materials:
Scrapbook Paper (the thicker kind works best)
Ribbon
Hole Punch
Scissors or Paper Cutter
 This is REALLY EASY and there are a million different ways you could do this and get very different looks. Feel free to put your own spin on it, but here is how I did mine.
I took 12x12 scrapbook paper, and cut it in half. I then cut the 6x12 piece of paper into 12 strips of 1x6 inch paper.
 Next, pick 6-12 pieces of the colors you like and make a pile. The more paper you use the fuller your ornament will be. If you choose a double sided paper, then you may want to use fewer pieces so you can see in the middle.
Now, punch a hole in both ends of the strips.
Cut a piece of ribbon 22-24 inches long. Fold it in half and feed it through one of the holes.
 Tie a knot.
Feed the other end of the ribbon through the other hole and decide where you want to tie your knot. This will determine whether the ornament is short and fat or tall and skinny. I liked mine best short and fat, but that is your preference.
 (I added a bead to this one, but not the others, so that is optional.)
Spread out the strips of paper.
 Next, let your extremely proud toddler hold up what he made for the camera.
Finally, take your new ornaments and put them on your tree for all to enjoy!

I hope you make some of these. They really are quick and easy. Let me know if you do. I'd love to see them!
I am linking up to a few other blogs for this one:
Subscribe to:
Posts (Atom)


