Showing posts with label Bargains. Show all posts

Saturday, October 9, 2010

Chair Turned Nightstand...

If you have visited my blog often, you know I love to make trash into treasures, and one of my favorite spots to look for stuff to re-do is on the family farm.  On a recent trip I discovered 2 little chairs sitting under a tree.  After asking my mother in law about them, I found out they were hers when she was a little girl.  I immediately asked for them, and as she typically does, she gave them to me with a shake of her head (like I was crazy for wanting them!)  Walker and his little buddy Wyatt were with me, and even Wyatt said, "Ms. Mandi, what are you gonna do with  those junky chairs?" 
Oh ye of little faith!  I took those little chairs and gave them a new lease on life!  I simply peeled off the paper seats and sanded a little, primed, and spray painted them.  I used Rustoleum Red spray paint and modge podged some paper for a new seat.  I have been looking for Connor a small side table for his bed, and the chair worked perfect. 

I used some little hooks I found at the hardware store to hang it, and the other one sits beneath it when Connor isn't using it. So what do you think?  Have you turned any trash into a treasure lately?


Funky Junk's Saturday Nite Special

Join  us Saturdays at tatertotsandjello.com for the weekend wrap   up           party!

Thursday, February 11, 2010

Easy Valentine Tutorial...

Hey friends!  I am still here.  My "little piece of paradise" as I call it has become increasingly crazy these days.  I have started my part-time job at the tax office, and still do my magazine job from home.  I also somehow agreed to coach Walker's soccer team, and heap on to that lots of doctors appointments for Connor and a household that needs a full time live-in maid (that's how it feels anyway) and there just aren't enough hours in the day! I have been struggling to find balance, and when something has to take a backseat it always seems to be my blog.  I have missed you all terribly and feel so out of the loop.  I just know you have all been up to lots of fabulous decorating and crafting. I would love to visit each and every one of my blogging buddies, but for now I will have to be content to just check in occasionally and really catch up when April 15 gets here and tax season is OVER!!
Wowser, that was quite an introduction for the quick tutorial I was gonna share with you.  Back to the subject at hand.  I have posted in the past  how I make my cards on SCRAPBLOG and I have friends that ask me about it a lot, so I thought I would post another easy tutorial on it.  Here is the Valentines Day Card I did this year.

Here's how I did it. 

  • Go to Scrapblog's site, and create an account.  They have a fantastic site.  Beware, you can get lost in time playing with all the possibilities and hours will disappear from your day.  Anyway, I always start with a blank canvas.  You can start with kits or templates, but I like to start from scratch.  I choose my backgrounds, stickers, and borders that are free.  Some of their stuff costs money,they call it credits, but you have to pay for them.  The prices are very reasonable, so if you find something you love, go for it.  But for me part of the fun is trying to make them for free.

  • Just upload your pictures and play around until you have created something you like. 

  • Next you want to "publish" what you made.  The button for this is at the top of the screen.  Once you have done that, you will be able to click on the "file" tab and export it as a JPEG onto your computer. 
  • I then upload my saved file to Walgreens or a similar photo printing service and print them for about 9 cents a piece. 
After buying a box of envelopes, I am getting great looking unique cards, invitations, etc. for a fraction of the price.  I hope you try this out. If you do let me know.  If this is not very clear, feel free to e-mail me with questions.  It's getting late and the bed is calling my name.  I hope you all have a fantastic Valentine's Day and I will be back as soon as I possibly can! 

Tuesday, December 8, 2009

FUN Paper Ornaments!

I am happy to say that my 2 boys inherited my love for working with their hands. We are always looking for crafts that they can do with me. I saw an idea for paper ornaments a while back, and decided to put my own spin on it. I have TONS of scrapbook stuff but have not scrapped in a long time, so this one allows me to use some of that fantastic paper. Here is a quick and easy tutorial on how to make your own.
Materials:
Scrapbook Paper (the thicker kind works best)
Ribbon
Hole Punch
Scissors or Paper Cutter

This is REALLY EASY and there are a million different ways you could do this and get very different looks. Feel free to put your own spin on it, but here is how I did mine.

I took 12x12 scrapbook paper, and cut it in half. I then cut the 6x12 piece of paper into 12 strips of 1x6 inch paper. Next, pick 6-12 pieces of the colors you like and make a pile. The more paper you use the fuller your ornament will be. If you choose a double sided paper, then you may want to use fewer pieces so you can see in the middle.

Now, punch a hole in both ends of the strips.

Cut a piece of ribbon 22-24 inches long. Fold it in half and feed it through one of the holes.
Tie a knot.

Feed the other end of the ribbon through the other hole and decide where you want to tie your knot. This will determine whether the ornament is short and fat or tall and skinny. I liked mine best short and fat, but that is your preference.
(I added a bead to this one, but not the others, so that is optional.)

Spread out the strips of paper.

Next, let your extremely proud toddler hold up what he made for the camera.

Finally, take your new ornaments and put them on your tree for all to enjoy!
I hope you make some of these. They really are quick and easy. Let me know if you do. I'd love to see them!
I am linking up to a few other blogs for this one:
DIY Day @ ASPTL

Wednesday, November 18, 2009

Roadkill Rescue...

There is a Roadkill Rescue party going on over at Infarrantly Creative and I really wanted to participate.

However, the rules of the party are that the item you are fixing up must have been free to you (i.e. from the trash, a relative, etc.) I have several projects I am working on right now, but most of them are items I bought at thrift stores, so I am gonna share some of my favorite fix-ups from past posts that do qualify. Here we go!

Up first are 2 chairs I got from the dump. The man was tossing out 4 of them, but I only had room for 2 at the time. I am still wishing I'd gone back for the others. Oh well. As you can see they were in pretty bad shape.
But after a little TLC, they have found a new lease on life! The black and white one I sold at an antique store downtown, hence the price tag.
But this lime green one is the chair in my craft room. I'm sitting in it now, proud as a peacock. If you want all the details on how this transformation occurred, you can follow this link.
Another one of my favorites is this old entertainment center. Lon's grandma gave it to me, and it was definitely dated, but it was free and that is my favorite word!
Nothing a new coat of paint and some beadboard on the back couldn't fix! I had my brother in law help me with this project while he was in town and it is also in my craft room. You can go here if you want a step by step on what we did.

The rockers on my front porch were also free. Lon's grandpa gave them to me. They were out at the family farm and nobody really used them anymore. They needed a sanding and some paint. But they are perfect on my front porch. I also added decorative door knobs for some detail to the tops of the chairs.
Last but not least, is another item in my craft room. It is the white shelf that holds all my fabrics. There is no "before" picture because I left it exactly as it was. It was given to me when an office went out of business. It held documents, but fits all my fabric perfectly.
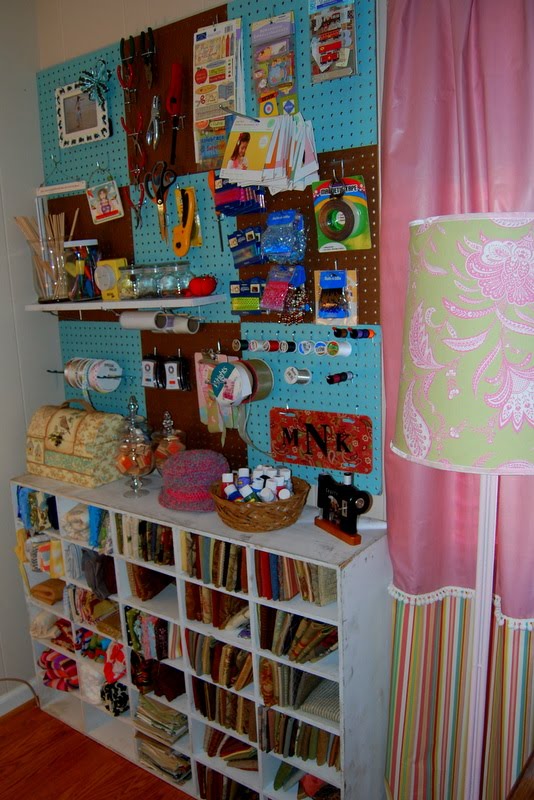
Thanks for stopping by, and for lots more Roadkill Rescues don't forget to visit Infarrantly Creative!

Wednesday, November 11, 2009

Cute Hat!!

It has been raining cats and dogs here as we get the remnants of Tropical Storm Ida off the coast. While I was getting ready this morning I could hear the rain over the TV, shower, and ceiling fan. Now that's a downpour! In a rain like that, what is a girl to do with her hair? Sport a cute hat! (Truth be told, if I hadn't had to take Connor to Charleston for a doctor appt., this girl would've stayed home!)

I didn't really have a cute hat, so I decided to make one on the fly. Literally, we are talking 10 minutes here. I had 2 baseball caps from the summer. They were 2 for $5 from Wal-Mart.

I took a fabric scrap, ran a piece of thread through it along the bottom, and then gathered it into a flower shape. Sewed a button in the middle, and stitched it right onto the hat. When I get tired of it, I will just cut the thread and have a solid black baseball cap again.

I tried to take a self-portrait, but pointing the camera at your head while you look away is impossible. This is the best I could do.
Connor thought he was really big stuff because he was sporting some of Walker's old shoes. We are all about some hand me downs. Connor has a bit of shoe fetish, like his Aunt Wewe. These are Nike Shox and Walker barely ever wore them so they are like new. They are a couple sizes too big, but I could not convince thiS HARD HEADED child of that. He says they made him "super fast" so I let him wear them. To my surprise he only tripped once.
So what do you think of my new hat? I think it would work just as well with a pin, but I didn't have any on hand. Cheap, easy, and quick. Just my kind of craft.

Wednesday, November 4, 2009

Quick and Easy Window Project...

My friend Amy and I completed this little window project in no time flat, so I thought I would share it with you. We got a glass window from Habitat for Humanity Restore.
It was a little beat up on the outside, so I covered it with paper and sanded it down good. I then spray painted it black.
If you wonder why it seems to take me forever to complete projects, here is your answer. I have 2 eager helpers always on the ready.
They love to use this spray gun handle on the spray paint. If you do much spray painting and don't have one of these, you need one. It will change your life. Just sayin'. It costs $2 at Wal-Mart.
Anyway, I then roughed it up a little more, and rubbed a dark chocolate stain over the edges.

Amy and I cut out some vinyl letters on my Cricut, and we were done.
Here it is hanging in my dining room. I just love how it turned out.

I have lots of projects about halfway done. I'll be posting some more as I finish them. Be back soon!

Tuesday, October 13, 2009

Easy Lampshade Makeover...

As any good blogger will tell you, you ALWAYS take before pictures. Well I forgot to, so you are gonna have to trust me that this sassy little thing was originally a $3 lamp with no shade from a yardsale and that it was the ugliest thing on the East Coast. Think dirty brown wood and brass. BUT, if you do A LOT of sanding, paint it red, and make it a cute shade you end up with a fantastic lamp!
I took a lampshade my Mom gave me years ago. It was just a simple white shade from Bed Bath and Beyond. I added fringe to the top, and ribbon to the bottom.


After a closer look, I decided to cover the cord with red fabric because it needed "something else". (Excuse the fact it is sitting on my kitchen counter. I still have not found just the right place to put this cutie patootie.)
A couple hours and $3 later you have an adorable lamp that is truly unique. This could be so cute in a lot of different spaces. Think primary colors for a little boy's room, or even pink for a little girl's.
I am linking up to ASPTL's DIY Tuesday
DIY Day @ ASPTL
and Reinvented's Trash to Treasure Tuesday. Hope you have a wonderful week and thanks for visiting!

Tuesday, October 6, 2009

Toile Chair Tutorial...

If you visit this blog very often, then you know I am not the best at tutorials. I typically direct you to someone else's tutorial since I usually forget to take enough pictures. Well that is probably the case here again, but this is a really simple chair makeover so I am gonna give it another try. Let's get started!

First up, you find an old chair at the dump. You let everyone there look at you like you have lost your ever loving mind because you are putting more trash back into your car than you just took out. Here is the little beauty I came home with:
Next I took off the seat. I just unscrewed it from the bottom. I then washed the whole thing down really well with some soapy water. While the chair is drying, I start prying off the fabric from the cushion.
Now this seat had no real padding so I added a seat cushion to it. I bought a pack of 4 of them at Wal-Mart forever ago, but they were not more than $10. I just cut it to size and then glue it down with spray adhesive. (Sorry here is where I was so involved I forgot to take pics!)

Next I went back to the chair and sanded any chips in the paint. I then spray painted it black with black spray paint. I do this more as a primer. I then brushed some black paint I already had over the whole thing. Let that dry and then spray paint again to make it look smooth and get any spots you missed. I then sealed it with a clear acrylic spray.
Back to the cushion. I stretched and stapled my toile fabric over the cushion and stapled it to the bottom. I then added my ruffle. I just measured all the way around the outside of the seat and doubled it. I wanted my ruffle to be 6 inches high so I cut and hemmed a strip of fabric 6 inches by the diameter doubled. (Are you starting to see why I don't do tutorials?) I then stapled the ruffle into place.
Finally you reattach the seat... and sit on the chair hoping it doesn't fall over. Mine didn't so I was good to go!

I actually got 2 of these chairs at the dump over the summer. The other one is my chair in the craft room. This is how it turned out and a link to that post if you want the details.
I am sharing this at ASPTL for DIY Tuesday
DIY Day @ ASPTL

and at Reinnvented for Trash to Treasure Tuesday.

Hope you have a great week and thanks for stopping by!

Related Posts Widget for Blogs by LinkWithin