Showing posts with label decorating. Show all posts

Tuesday, November 9, 2010

Changes to the Picture Wall...

One of my most treasured possessions is family photographs, and while I have several places I display them, my favorite is the picture wall in my living room.  This wall has evolved over the past few years, and continues to change.  I have posted about it in the past, but have made some recent changes.  I love sharing this idea because it is affordable and unique.

This time around I took down all of the pictures and painted a tobacco color inside the molding.
I then changed out the pics that were in color to black and white, and arranged how I thought I wanted them on my dining room table.
Next came the hard part, putting all those pictures back up without a real guide.  I more of an "eyeball it" type of girl.  That whole measure twice cut once thing doesn't apply to me.  I just hammer, move, hammer again, etc. 
And there you have it.  My family picture wall.  I'm sure it will eventually change again, but for now, I love it!
What do you think?

Saturday, October 9, 2010

Chair Turned Nightstand...

If you have visited my blog often, you know I love to make trash into treasures, and one of my favorite spots to look for stuff to re-do is on the family farm.  On a recent trip I discovered 2 little chairs sitting under a tree.  After asking my mother in law about them, I found out they were hers when she was a little girl.  I immediately asked for them, and as she typically does, she gave them to me with a shake of her head (like I was crazy for wanting them!)  Walker and his little buddy Wyatt were with me, and even Wyatt said, "Ms. Mandi, what are you gonna do with  those junky chairs?" 
Oh ye of little faith!  I took those little chairs and gave them a new lease on life!  I simply peeled off the paper seats and sanded a little, primed, and spray painted them.  I used Rustoleum Red spray paint and modge podged some paper for a new seat.  I have been looking for Connor a small side table for his bed, and the chair worked perfect. 

I used some little hooks I found at the hardware store to hang it, and the other one sits beneath it when Connor isn't using it. So what do you think?  Have you turned any trash into a treasure lately?


Funky Junk's Saturday Nite Special

Join  us Saturdays at tatertotsandjello.com for the weekend wrap   up           party!

Monday, January 18, 2010

Christmas Re-Cap...

I realize that we are well on our way into 2010, but since I was so far behind on my blogging and missed out on all the Christmas fun, I thought I would do a bit of a Christmas Re-Cap.  Atleast this way when next Christmas rolls around I'll be able to remember what I did this past Christmas.  Right now I can barely remember yesterday.  My memory is like swiss cheese, full of holes!  Anyway, here are some of my favorite things from this Christmas.

I scaled back this year in all areas.  We bought less.  We did more hand made.  I even decorated less.  I had a hard time getting into the decorating and it felt a little forced, so I spent less time decking the halls and a lot more time enjoying the season with my boys.  Looking back, those changes were all for the best.  With that said, I didn't put up all of my trees.  We did the boys' tree in the family room:

This tree has all of the ornaments they have made or picked out in their short little lives. They are all about the colored lights, so I just go with it.
This is the mantle in the family room.  Walker helped me put it up and he was so proud.  It is in the same room as the boys' tree so it also has colored lights.


Walker got a new tree for his room this year.  It was a tacky little tree, but he LOVED it, and that is what matters.

Connor's tree is white and he enjoys having one in his room so much.

I put the 30 year old tree from Lon's childhood in my kitchen window. It holds ornaments the boys have made in church and school.  Those are the most special ornaments to me.

I hung this wreath that I "beefed up" on the front door.

I put this tall wooden snowman on the front porch.

I put all of our Christmas cards on a simple ribbon.

We made a lot of people birdhouses:


We made the boys teachers ornaments and some baked goods.  This is one of Walker's ornaments.

And here is Connor's ornament for his teacher.

But more than anything else, we spent time together.  We crafted, baked, watched Christmas movies, and drank more hot calorie laden drinks than it should be legal to consume in a month's time.  Guess that explains why I will be starting Weight Watchers Wednesday back up on Wednesday!  I hope your Christmas was a great one, full of special times with family and friends too!

Wednesday, November 18, 2009

Roadkill Rescue...

There is a Roadkill Rescue party going on over at Infarrantly Creative and I really wanted to participate.

However, the rules of the party are that the item you are fixing up must have been free to you (i.e. from the trash, a relative, etc.) I have several projects I am working on right now, but most of them are items I bought at thrift stores, so I am gonna share some of my favorite fix-ups from past posts that do qualify. Here we go!

Up first are 2 chairs I got from the dump. The man was tossing out 4 of them, but I only had room for 2 at the time. I am still wishing I'd gone back for the others. Oh well. As you can see they were in pretty bad shape.
But after a little TLC, they have found a new lease on life! The black and white one I sold at an antique store downtown, hence the price tag.
But this lime green one is the chair in my craft room. I'm sitting in it now, proud as a peacock. If you want all the details on how this transformation occurred, you can follow this link.
Another one of my favorites is this old entertainment center. Lon's grandma gave it to me, and it was definitely dated, but it was free and that is my favorite word!
Nothing a new coat of paint and some beadboard on the back couldn't fix! I had my brother in law help me with this project while he was in town and it is also in my craft room. You can go here if you want a step by step on what we did.

The rockers on my front porch were also free. Lon's grandpa gave them to me. They were out at the family farm and nobody really used them anymore. They needed a sanding and some paint. But they are perfect on my front porch. I also added decorative door knobs for some detail to the tops of the chairs.
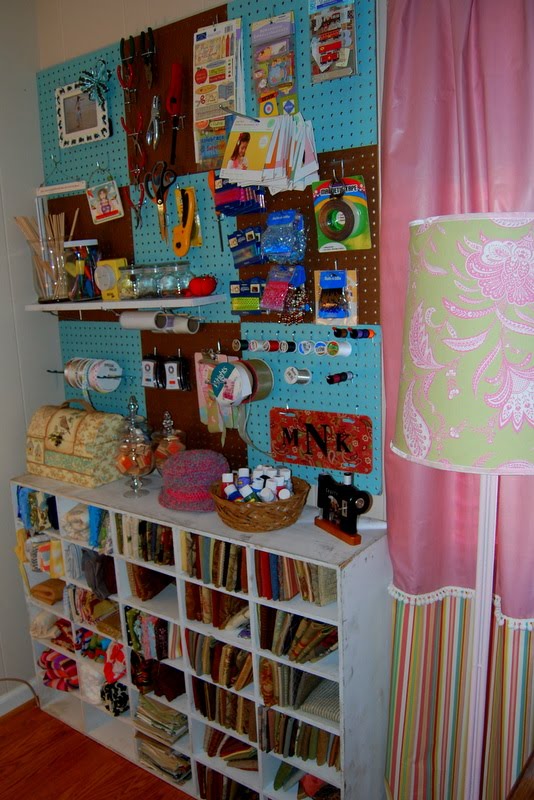
Last but not least, is another item in my craft room. It is the white shelf that holds all my fabrics. There is no "before" picture because I left it exactly as it was. It was given to me when an office went out of business. It held documents, but fits all my fabric perfectly.
Thanks for stopping by, and for lots more Roadkill Rescues don't forget to visit Infarrantly Creative!

Monday, November 9, 2009

Scrap Fabric Balls...

I originally found a tutorial for these online, but I have no idea where. I have been making them again lately because they are a wonderful way to use up old scraps, and if you sew very much you have a lot of those!
For your materials, just get all your scraps together. I like mine really thin, so if they aren't already that way I cut them a time or two. Also, make yourself 2 cardboard "donuts". I made mine about 4 inches wide with a 1 1/2 inch center circle.

Now the fun starts. Just wrap your fabric around the "donut" and through the center. When one strip ends, start another. Keep doing this until you can't fit any more fabric through your center hole.
Next you cut the edges all the way around.

Tie a piece of ribbon or another scrap of material around the center. Make sure it is very tight so that your scraps don't slip. Cut or pull your "donuts" out of the center, and fluff your ball.
Find a cute place to hang it and enjoy all your crafty goodness. I think a bunch of these would be perfect on a Christmas tree, but I love them too much to only have them out at Christmas. Mine hang several places. I think they are kind of like tassels, and use them on lamps, knobs, and even furniture.
I used Western fabrics on this one for Walker's lamp.


I'm gonna post this at Chris's "I Can Make That" Christmas party.
And at ASPTL's DIY Day


DIY Day @ ASPTL


Saturday, November 7, 2009

The Ultimate Tassel Tutorial...

This post was first "Guest-posted" at Edie's 12 Days of Handmade Christmas Party. I am posting it here for reference, but if you missed the party you should still go over and visit. There are some seriously fun ideas for presents over there.

Hey friends! My name is Mandi and I have a little blog called Mandi Shandi's. The fabulous Edie was one of my very first "Blog "friends, and we all know how super cool she is (no editing Edie!), so when she asked me to take part in this fab 12 Days of Christmas Party she is having, I was thrilled! I will warn you that I am not typically the best tutorial writer.I am super-busy mom of 2 young boys,
(Me above, and those rowdy boys below.)
and I get distracted easily, but I'm taking extra care this time to make sure I get enough pictures and give detailed instructions. If I manage to leave out any details that you need, feel free to hop over to my blog or e-mail me. Who am I kidding? I hope you come over and visit my blog regardless! I love making new friends!

Let's get this party started! This is what I am calling the Ultimate Tassel Tutorial because I am gonna give you so much info. that it may qualify as overload, but you will be able to start making decorative tassels immediately.

I recommend you start off by gathering your supplies. You will probably need to shop for a couple things, but most crafters already have a lot of this stuff on hand.
Wood Candle Cups- Available at all craft stores in the unfinished wood section.
Small Screw Eyes- Available at Target, Wal-Mart, or any hardware store.
Ribbons, Trims, Fringe, or Yarn- I am a Hobby Lobby girl. I think their prices are just hard to beat, so most of my embellishments come from there when it is on sale. You can also find nice fringe at Hancock Fabrics.
Hot Glue Gun and LOTS of Gluesticks.
Maximum Adhesive Glue- I use E6000 (not pictured b/c I ran out, but you can get it at Wal-Mart or craft stores.) **NOTE**Since publishing this post I have found out that this glue is banned in CA because it can be harmful. I will be switching to another glue, but use your own judgement.
Topper or Small Figurine- I pick up small figurines everywhere, even the Dollar Tree at times. I also like to use Christmas ornaments because they already have the eyehook in the top.
Drill- Ideally you would use a jewelry drill, but I use a regular drill and am very careful.

Since this is a Christmas party, I am gonna make a Christmas tassel using an ornament. I can skip the drilling part. Normally though, you would start off by drilling a small hole in the top of your figurine. I always put a little glue in the hole to make sure the eye hook stays in. Screw in your eye hook.

Next glue your topper to the candle cup. I use E6000 for this and usually let it dry for atleast an hour. Run a pretty ribbon through the eye hook and tie it in nice bow or knot. Make sure it is long enough to hang properly after tied. I cut my ribbon between 10 and 12 inches.

Now the fun starts. I line up my trims and get busy picking colors. I have found that my tassels look most balanced if I use the widest trims on the bottom and work to the smallest ones on the top. I line my trims up in this order.
Once I have picked the bottom layer, I take it and roll it up to see how much it will take to fill the inside of the candle cup. When I get a good idea, I cut the fringe at that length, add a strip of hot glue and roll it back up.

Then I thoroughly glue the interior of the candle cup, and stuff my rolled up fringe inside. It should be a tight fit.

I cut my ribbon in equal lengths and get it ready to glue. It typically takes between 4 and 7 strips of ribbon, depending on the diameter of the ribbon and the candle cup or dowel rod you are tasseling. The hot glue dries fast, so it is best to already have your ribbon cut. Make sure if you are making loops and your ribbon is printed, that you glue the printed side down so when you loop it the print will show.
Keep adding layers until you reach the top of your candle cup. At this point you will need something nice and fluffy to round out the tassel. I say fluffy, because that type of fringe is the most forgiving if you don't get it just perfect. It also covers the bond between the topper and the candle cup so you want something thick. You could also add bows or ribbon. The sky is the limit.
Last but not least, carry your new tassel into the bathroom and blow it with the hairdryer. This eliminates all those pesky hot glue strings. Now its time to find a home for your new beauty. Hang them on doorknobs, lamps, furniture, or even ceiling fans.
And just in case you need a little more inspiration to get you tasseling, here are a few favorites that I have made recently.

There you have it. The Ultimate Tassel Tutorial. I hope I was clear enough on my instructions, and if you make some tassels stop by my blog and let me know. I'd love to visit you and see them all!
Related Posts Widget for Blogs by LinkWithin